Guild Challenges

Most Guilds have a challenge (or two) that they offer to the members to participate or not.  In my Guild, Timberlane Quilters Guild, we are given a challenge at our first meeting in September and have the entire Guild year to work on it.  Our last meeting is in June of the following year and at that time we show off our creativity, skills and hard work.

This challenge was a simple paint chip challenge.  In September we were given a paper bag with a paint chip card and we were to use at least one of the colours on the card in our quilt.  A pretty simple challenge but the creativity it inspired in those that participated was unbelievable.  We had our year end party last night so I don’t have the pictures yet but as soon as I do I will post them here or at least the link to the Guild’s site so I can share with you.

Paint Chip Challenge

I can share mine though.  When I opened my paper bag last year the paint chip I received was of the ‘denim’ sort of blues.  That was when I realized that the challenge wasn’t necessarily in the colour we got but in what to do with it!  I spent a couple months just thinking about it and decided to make something playing off the word ‘blue’.  Hmm – blue suede shoes, blue lagoon; nothing.  Feeling blue… feeling a little blue…that was something I could work with.  Now, what to make.

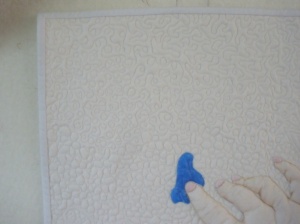
I liked the idea of “feeling a little blue” and could picture something with just a small spot of blue in it.  To feel it I’d have to have a hand in it so to speak ;).  I looked around online to see if I could find a paper pieced block of a hand but decided that I would rather it look more realistic.  I enjoy doing trapunto, not that I’ve done a great deal, but I figured that was the only way I could make something that looked real.  I took a quick picture of my hand with my finger out as if I was touching something and printed it out a little bigger than life-size, one in colour and one in greyscale.

I traced the outline on some white cotton and used my Derwent Inktense water soluble pencil crayons to colour it in.  If you’ve never tried them they are a blast to play with.  You can use them as is or with water or a fabric medium and the colours are beautiful.

Painted and stitched hand

Once the colouring was done I pinned a small piece of  Dream Puff batting underneath and stitched around the hand with Vanish Extra.  After trimming away the extra batting I used another scrap for the batting and some leftover muslin I had for the backing.  So far this challenge had cost me nothing 🙂

background fill

background fill

I decided to use the background for practicing background fills.  Because it was background fill I used So Fine! thread; any of the thicker threads would have been too heavy and just taken over the piece.

I did this on my Janome MC10000 and not the longarm.  Seeing as I teach machine quilting on domestic sewing machines at the local QS I need to keep in practice!  All in all it was a lot of fun.  I wasn’t sure how to finish off the wrist area so I went down to the thrift shop and picked up a blue corduroy shirt for $3 which became the total cost, besides my time, for the project.

more background fill

and more background fill

I'm Just Feeling a Little Blue

What to do when your computer breaks down? Quilt!

My excuse for not posting regularly?  No computer.  I had no idea how dependant one  becomes on these darn things.  My whole morning routine had to change LOL  Anyway, long story short, after a month of having my Imac in two different shops they came to the conclusion that they really couldn’t figure out what the heck was wrong with it.  I had always heard that it was rare for a Mac to have problems but when they did it usually meant the computer was toast.  So – I sit hear typing away on my brand new replacement Imac free of charge thanks to Apple (well, more to the fact that I had purchased the Apple Care to go with it!)

Once I calmed myself from not having a computer I did manage to do more quilting than normal.  Lesson to be learned perhaps?

Kaleidoscope with Disney's "Cars" print

I’ve received a few Kaleidoscope quilts recently and this fun one was done with the Disney’s Cars print.  She supplied her own batting and it was a rather thick and heavy poly so I wanted to keep the quilting pretty light.  The Kaleidoscope blocks have a simple Terry Twist in the centre area only – takes up about half the block – and gave the sense of wheels (car theme fabric after all.)  I did the crossed flags in the large squares and single flags in the small on-point squares.  I simple open meander filled in the rest.

racing flags

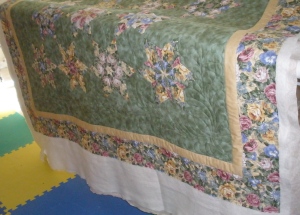
floral kaleidoscope

This is another Kaleidoscope that I received.  A very pretty floral print. Unfortunately, I don’t have a picture of it spread out.  This was for a young lady and the customer wanted it to look a little more formal.  Once again I did a very simple quilting in the kaleidoscope block with Victorian (formal, bumb…) feathers in the open green area around.

simple petal quilting in the blocks

Stitch in the ditch around the yellow border and more feathers in the floral outer border.  These ‘petal shapes were quilted in the kaleidoscope blocks and the plain green blocks.

I think it is important when the block is such a feature in the quilt that my quilting needs to compliment the block; draw your eye to the block and not overwhelm the quilt.

victorian feathers

feather corner

Mystery Quilts and the sometimes quilting problems

I first posted a picture of this mystery quilt last year when I completed it.  I has been in my studio since then; sometimes hanging around, other times folded up and put away but in all that time I couldn’t for the life of me figure out how to quilt it.

mystery quilt

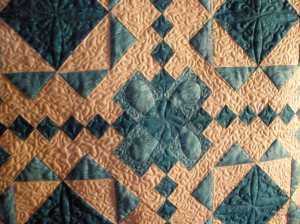
Chocolate brown, beige, dark and light turquoise.  I really like the colours but the longer I stared at this top the harder it was to decide how to quilt it.  There was just something about it that was rubbing me the wrong way.

I started an on-line machine quilting course at MQResourse (really, really recommend this site!) with Carla Barrett for learning to ‘read’ the quilt tops and develop custom quilting designs.  Fabulous course but when we were asked to send in problem quilt tops this is the one I thought of and immediately sent in and worked with.

I did agonize over this one.  I realized that even though I liked the colours they were too stark – too much contrast – one of the problems with a mystery quilt.  All you can do is follow  ‘light, medium, dark’ and then you are at the mercy of the pattern.

Ok – beyond the fabric what was wrong?  Too many little pieces!  I like the overall design of the blocks all together but when I try to break it down into areas my eyes just jump all over the place.  Another “too much”.  Funnily enough, I did manage to discover stars in the layout!  If you look at the lower left block layout there is an eight point star formed by the turquoise 1/2 sq. triangles.

see the star?

I really wanted to use that in the quilting design but seeing as I was doing this in January I was already a bit late for Christmas 2009!  Well, I had to get it quilted and there is nothing like a deadline to push one into completing a task!

The top is too small for anything more than a very small lap quilt so I decided to add a hanging sleeve.  This also meant that I could quilt fairly densely as the resulting stiffness wouldn’t matter.

I sketched in the spine for a feather border along the top (and bottom) and had it droop down (up) the corners.

Feather border

At the sides I simply did a feather motif in the centre and quilted a background fill around it all to have the feathers pop.

Side feather motif

I must really apologize for the pictures – lately I can’t seem to take anything that isn’t a tad blurry.

Even though I wanted to emphasize the star I found I was too chicken to simply use a turquoise thread and fill in the area – in other words use turquoise thread over the beige – so I decided to use a simple stipple background fill in the beige areas and put a little fun motif in the turquoise area.  I left the turquoise (I’m getting good at typing that word!) triangles alone and that was my concession to the star LOL

Star

Star

Other block

I did the continues curves in the small diamonds.

All in all I’m happy with how it turned out and I guess more importantly the recipients like it!

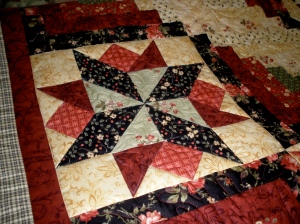
Ramblin’ Rose Meets Jamestown quilt

I fell in love with this quilt when my customer first brought it to me.  I had seen it on-line some time ago but this was the first time up-close and personal and I was going to be able to quilt it to boot!

I believe this layout for the sampler blocks and log cabin blocks are available as a kit from Marti Michell.

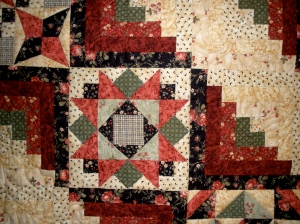
I wanted to emphasize the ‘furrows’ of the beige log cabin blocks with a complement in the burgundy log cabin areas.

Ramblin' Rose Meets Jamestown

Here I’ve just started loading the quilt and I’m basting around the outside and pining throughout the middle.

'Dusty Miller' feather

I didn’t want just the usual feather meander.  I had played with a type of border fill in an on-line custom quilting class I took and I came up with something I called a Dusty Miller feather.  My customer said it looks like Oak leaves and that’s OK too 🙂  The picture on the right shows the quilting pattern a bit.  Each burgundy log cabin had a stylized Dusty Miller motif.

I carried the same motif into the different blocks for continuity and used a variation of continuous curves in the squares and triangles in the blocks

blocks

block2

The plaid border and the burgundy border were both stabilized by stitching in the ditch.  I wanted to do a piano key border and after coming to look at the partially done quilt my customer agreed that it would suit the quilt.  It is going to her son and his wife and even though the fabric was all floral it does not look like a feminine quilt.

back

Unfortunately, I didn’t get a good picture of the border before it was picked up but you can see it from the back as well as a good look at my ‘Dusty Miller’ feather.

I know these quilts take a lot of work – stabilizing each border and block, but I do enjoy working on them and the final results.

Quilting motifs

I received a top from a customer who told me she had never had a quilt done professionally before.  I was in the middle of an on-line custom quilting course and decided this would be a perfect top to work with.  Fairly simply assembly – floral blocks with borders of green and red.  The only stipulation she had was that she wanted flowers quilted in the 4 corners.

I decided to use the floral blocks as inspiration and made a hummingbird motif from a copy-right free site I found on-line.  I used my printer to shrink it to the size I needed for the blocks.  I ironed it onto freezer paper and then ironed on 2 more layers so the pattern would be quite stiff.

humming bird pattern

I would use these along with air/water soluble marking pens on the quilt top itself.

I spent a lot of time trying to find a floral motif to use in the corners (outlined in red in the picture).  The floral blocks were too ‘dainty’ to use as motifs and I sketched a number of different ideas until I came upon the realization that I could already quilt pansies and I knew my customer liked pansies as well.  I drew my own design for the corner motifs and then used the freezer paper to stiffen the pattern the same way as I did the humming birds.

pansy basket

I drew around the outside of the patterns and then just a few inner lines as a guideline while I was quilting.

This was the first time I had ever used my quilting as the focal point on the quilt.  A little scary but I thoroughly enjoyed doing this top.

humming bird

I just did a simple stippling around the motifs.  Here’s a close-up of one of the humming birds; they were done in all the white  setting triangles around the outside of the quilt.  I did continues curves in the red, green and white borders.  These were long strips of fabric but I divided and marked them as if they were made of smaller squares and quilted accordingly.

pansy basket

Here you can see one of the pansy baskets and the single pansy I put in the smaller corner setting triangles. The top had both white and off-white and  I matched the thread through-out the quilt – So Fine! Snow for the white setting triangles and So Fine! Putty around the floral blocks.

pansy basket close-up

My customer was going to use this as a tablecloth but once she saw it she decided to set aside an area in her home and used it as a wall-hanging complete with display table beneath and flowers.

I do enjoy all types of quilting but I must say that this really made me realize how much I love the creative aspect of custom work.  Good thing I do as another customer saw this quilt and dropped off her quilt of the same pattern!  Hmmm – this time I see butterflys…