Mosaic Magic Quilt part II

For anyone not following the blog, here is a picture of the top I’m quilting for my customer.  This is the original from quiltwoman.com

Mosaic Magic

and here is my customers done in beige and white with one of the five layouts given for this block.

Mosaic Magic loaded

She chose ‘Fantasy Feathers’; a very casual loose type of edge to edge quilting .  Here are a couple close-ups of the quilting design.  Wool batting is being used and you can really see the higher loft that is achieved.

Fantasy Feather quilting design; high loft

Fantasy Feather close-up

All done!

Ready for customer pick-up

I really like how it turned out.  More importantly, so did my customer when she picked it up!

Mosaic Magic with Fantasy Feather quilt design

Making your own Quilting Motifs


Custom motifs

I first did this quilt layout (pattern) for a customer awhile ago with custom motifs of hummingbirds (you can see it here). She showed a friend that had done the same quilt and so I received it as well.  I told them that I wouldn’t repeat the quilting as the hummingbirds were unique to the first quilt so we decided on butterflies instead.

Once again – Google is my friend – and I found some copyright free pics of butterflies and played with them until I found the basic shape I wanted and

making the butterfly template

then designed the wing to suit quilting.  After finalizing the outline on paper I dry-iron it to a sheet of freezer paper and then add three more sheets of freezer paper to the back so the butterfly still showed.  I find that this makes for a nice firm template that I can use to mark the quilt top.  Remember to use a dry iron to build up the freezer paper – if you use steam you will end up shrinking the paper and it will curl on you.  Once it has cooled I cut it out and can then use it to outline the shape on the top.  I usually use an air-erasable marker or chalk but remember to test these on the edge of the quilt first!

The four red border corner square were also to have something special in them.  I didn’t want to repeat the pansy basket I did on the other one so instead I put a feather basket in there as well as a feather border. Each basket was done free-hand, no chalking, except for the square bottom basket that I used a ruler for.

feather4

Because they are all freehand – each basket is slightly different.

feather2

This is the first time I’ve ever put this type of feather onto a quilt.  They are ‘formal feathers’ or ‘victorian feathers’ or ‘over-the-top’ feathers; they are called many different things.   I’ve played with them and have recently taken an on-line class for them.  I do like the look of this feather but you really have to PPP alot! including time spent drawing them over and over and over.

feather3

feather

Here are some shots of the butterflies.  You will see that once I actually started quilting them I didn’t follow the pattern I had drawn on the paper.  I found that it was too busy and would not give a nice puffy contrast so I simply put 3 feathers inside the wings.

butterfly motif

The butterflies go around the outside of the quilt – all of them facing away from the centre  as if they are flying out from the quilt.  I really thought about turning the bottom two butterflies because there is a definite top to this quilt but it just didn’t look right.  You can see the corner butterfly in the ‘feather’ picture above – that is simply half of my template with an extra wing added in the background.

I did the formal feather border but of course it doesn’t show up that well so I’ve included a picture of the back of the quilt.  Frustrating that it is the back of the quilt where some of our hard work shows up the best LOL

formal feather border - back of quilt

All of the thread used was Superior’s So Fine! Remember – all thread orders over $55 have NO shipping charges!

Quilting motifs

I received a top from a customer who told me she had never had a quilt done professionally before.  I was in the middle of an on-line custom quilting course and decided this would be a perfect top to work with.  Fairly simply assembly – floral blocks with borders of green and red.  The only stipulation she had was that she wanted flowers quilted in the 4 corners.

I decided to use the floral blocks as inspiration and made a hummingbird motif from a copy-right free site I found on-line.  I used my printer to shrink it to the size I needed for the blocks.  I ironed it onto freezer paper and then ironed on 2 more layers so the pattern would be quite stiff.

humming bird pattern

I would use these along with air/water soluble marking pens on the quilt top itself.

I spent a lot of time trying to find a floral motif to use in the corners (outlined in red in the picture).  The floral blocks were too ‘dainty’ to use as motifs and I sketched a number of different ideas until I came upon the realization that I could already quilt pansies and I knew my customer liked pansies as well.  I drew my own design for the corner motifs and then used the freezer paper to stiffen the pattern the same way as I did the humming birds.

pansy basket

I drew around the outside of the patterns and then just a few inner lines as a guideline while I was quilting.

This was the first time I had ever used my quilting as the focal point on the quilt.  A little scary but I thoroughly enjoyed doing this top.

humming bird

I just did a simple stippling around the motifs.  Here’s a close-up of one of the humming birds; they were done in all the white  setting triangles around the outside of the quilt.  I did continues curves in the red, green and white borders.  These were long strips of fabric but I divided and marked them as if they were made of smaller squares and quilted accordingly.

pansy basket

Here you can see one of the pansy baskets and the single pansy I put in the smaller corner setting triangles. The top had both white and off-white and  I matched the thread through-out the quilt – So Fine! Snow for the white setting triangles and So Fine! Putty around the floral blocks.

pansy basket close-up

My customer was going to use this as a tablecloth but once she saw it she decided to set aside an area in her home and used it as a wall-hanging complete with display table beneath and flowers.

I do enjoy all types of quilting but I must say that this really made me realize how much I love the creative aspect of custom work.  Good thing I do as another customer saw this quilt and dropped off her quilt of the same pattern!  Hmmm – this time I see butterflys…

Online Quilting Classes and quilt show

Well, our quilt show weekend has finally arrived here in Powell River, BC.  Even though I’m not one of the ones that will be running the show I’ve volunteered to help with set-up and man the admissions table tomorrow and doing just that little bit is enough.  I know that the committee heads that put on a quilt show work like crazy and for little thanks so … “thanks”  for all the work you’ve done and will be doing this weekend 🙂  I’ll get some pictures of the show posted next week.

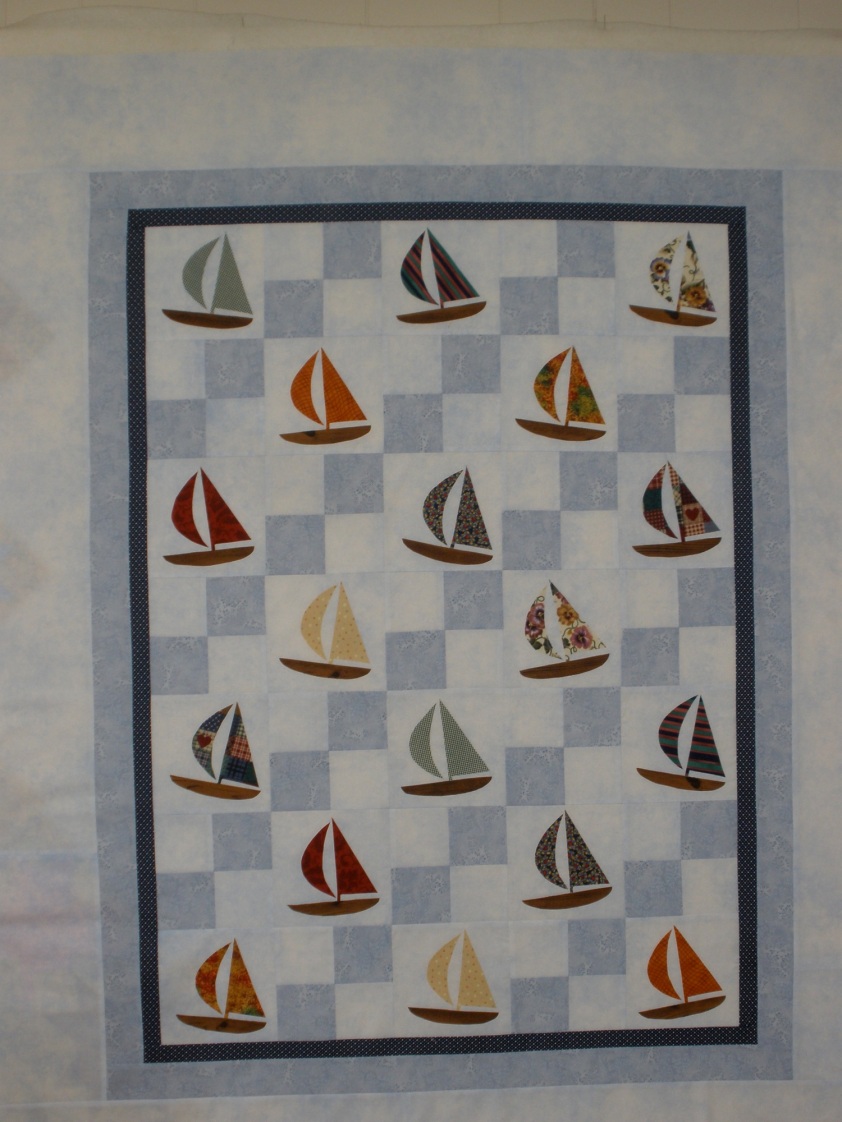
Here’s a picture of a quilt my friend and I put together this past weekend.  It is for another on-line quilting class that I’m taking.  This one is for custom quilting and besides getting the quilt ready, we’ve been doodling this week trying to come up with quilting design ideas.


BAILEY'S BOATYARD

BAILEY'S BOATYARD

It is a simple applique and in fact because I was so far behind in getting ready for the class the sailboats are just “Steam-a-Seam” d’ down.I wouldn’t have been this far along if it wasn’t for my girlfriend tracing out the sailboats, choosing the fabrics and cutting them out!  Thanks Kathryn 😉

Now that we’re going to be doodling on paper before we get to the top itself I’m going to try and find the time to actually sew them down.  I know lot’s of people do just use this product but I don’t trust that the pieces won’t lift.  That and the fact that my darling husband once, being the helpful soul that he is, took my wall-hangings down and washed them all in a fit of Spring Cleaning one year!  I’ll post my doodles once I have them organized.  I’m really looking forward to this class, lots of inspiration.  If you’ve ever thought about taking an online quilting class I heartily recommend them.  This will be the third once I’ve done and I find them very educational.  You are able to work at your own pace and there has always been lots of interaction by way of the discussion boards where everyone can post their progress and questions.  There are usually many more participants in an online class than a regular class held at a shop so there are many more ideas, problem solving and, best of all, more pictures of quilts to look at!